Showing posts with label dessert. Show all posts

Sunday, June 29, 2008

Whole Wheat Chocolate Chip Cookies


I am trying to use whole wheat flour more and more so when I saw this recipe for Whole Wheat Chocolate Chip cookies over at Serious Eats, I was immediately on board.

Using whole wheat flour certainly didn't take anything away from the cookie. They were soft and chewy and disappeared from the cupboard just as quickly as any regular cookie.

The only thing I have changed from the original recipe is adding an extra cup of chocolate chips... I like my cookies chocolatey!

INGREDIENTS

3/4 c. unsalted butter
1 c. sugar
1 c. brown sugar
1 1/2 tsp. vanilla
2 eggs
2 c. whole wheat flour
1 c. flour
3/4 tsp. baking soda
1 tsp. salt
2 c. chocolate chips


DIRECTIONS

1. Preheat oven to 375 degrees.

2. Cream butter and sugars until light and fluffy. Mix in vanilla and eggs.

3. Whisk together flours, baking soda, and salt. Gradually stir flour mixture into butter mixture and then fold in chocolate chips.

4. Drop onto a greased or lined cookie sheet and bake 8-10 minutes. Allow cookies to cool for 5 minutes before removing to a wire rack to cool completely.


Thursday, February 28, 2008

Espresso Crepes with Dark Chocolate Sauce

I found this recipe on MyRecipes.com, a site I will be checking in on more frequently. They have a lot of neat recipes and cooking tips. I also love the themed calendars and series.

This is a dessert for the coffee lover in all of us: Espresso Crepes with Ice Cream and Dark Chocolate Sauce.


The crepes can (and should) be made ahead of time so they are allowed to cool. To cook the crepes, I used an 8-inch skillet and it worked fine. I don't have a crepe pan and would use it so infrequently that I don't want to give up the real estate in my kitchen for one (even though, admittedly, it wouldn't take up much room).


INGREDIENTS

For the crepes

1 c. all-purpose flour
2 tsp. sugar
2 tsp. instant espresso powder
1/4 tsp. salt
1 c. low-fat milk (I used skim)
1/2 c. water
2 tsp. butter, melted
2 large eggs


For the chocolate sauce

1/3 c. half-and-half
2 tbsp. honey
3 oz. semisweet chocolate, chopped


2 cups low-fat coffee ice cream (or frozen yogurt)


DIRECTIONS

Crepes

Lightly spoon flour into a dry measuring cup and level with a knife. Combine flour, sugar, espresso powder, and salt in a small bowl.

Combine milk, water, melted butter, and eggs in a blender. Add the flour mixture to milk mixture, and process until smooth.

Cover batter; chill for 1 hour.

Heat an 8-inch nonstick crepe pan or skillet over medium heat. Pour a scant 1/4 cup batter into pan; quickly tilt the pan in all directions so batter covers the pan with a thin film. Cook about 1 minute. Carefully lift the edge and turn when the crepe can is lightly browned and can be shaken loose. Cook another 30 seconds or until center is set.

Place crepe on a towl; cool completely. Repeat with remaining batter; makes about 13 crepes.


Chocolate sauce

Combine half-and-half and honey in a small saucepan over medium heat; cook 3 minutes or until tiny bubbles form around the edge of the pan, stirring frequently (do not boil). Remove from heat. Add chocolate; stir until smooth. (Note: As you can tell from the pics, my sauce wasn't all that thin. Maybe a little more cream would have done the trick?).

Fold each crepe in half; fold in half again. Place 1 crepe on each of 8 plates. Top each serving with 1/4 cup coffee ice cream; drizzle with 4 teaspoons sauce.

(Check out that scoop action!)

Nutritional Info

Serving Size = 1 crepe, 4 tsp. chocolate sauce, 1/4 c. low-fat ice cream

Calories: 229 (28% from fat); Fat: 7.1 g; Protein: 6.2 g; Cholesterol: 45 mg; Calcium: 93 mg: Sodium: 105 mg; Fiber: 0.8 g; Iron: 0.6 mg; Carbohydrate: 25.5 g

(Obviously this is a guideline only, as actual content would differ depending on the type of ice cream used, substitutions made, etc)

Monday, February 4, 2008

Chocolate Cookie Bark

I gave this Chocolate Cookie Bark as gifts to a few people, wrapped in cellophane and curly ribbon, and got several requests for the recipe. Bark is a Christmas staple for many... adding Oreo cookies to it can only be a good thing.


Bonus (if you need one beyond the Oreos): it couldn't be easier to make and the marble effect looks so impressive.


I found this recipe on the Kraft Canada site and have made it two years in a row.

INGREDIENTS

1 pkg. (8 squares) semi-sweet chocolate
1 pkg. (6 squares) white chocolate
2 Tbsp smooth peanut butter
10 Oreo cookies

DIRECTIONS
Chop Oreos into small pieces, about the size of a dime (this is my preference).
Place semi-sweet and white chocolate in separate medium microwaveable bowls. Microwave until completely melted, in short intervals (30 seconds), and stirring frequently. (I like to use a water bath instead of a microwave to avoid burning the chocolate).
Add peanut butter to the white chocolate; stir until well blended.
Drop spoonfuls of the chocolate mixtures onto a baking sheet that is covered with wax paper, alternating the colours of the chocolates. Cut through the chocolate mixtures several times with a knife for the marble effect.

Homemade Peanut Butter Cups


These are, by far, my favorite from all of the holiday treats I've made this year.

Anyone remember the two really skinny girls on Survivor that took their tops off for peanut butter and chocolate? I may have gone right along with them. Okay, maybe not ... but I do really love the combination. I go for anything Reese and I'm thinking this is about as close as anything homemade is going to get.

I got this recipe for peanut butter cups from a food blog that I have just recently started frequenting.

A note about the paper wrappers: I bought smaller wrappers than the author used so I was able to make about 48 cups where she was only able to make about 24 (I couldn't find any the size of Reese peanut butter cups). Mine were about an inch across, about the size of the miniature Reese cups.
These are a little labor intensive but so worth it in the end because they taste so good your friends and family will rave about them!
While standing in front of the chocolate chips at the grocery store, I decided to make white, dark, and milk chocolate cups. The white cups are fabulously rich! I'll list the ingredients and directions as the original author did since the addition of the different chocolates does not really change anything.

INGREDIENTS

Approx 1 1/2 cups dark chocolate, chopped, or dark chocolate chips (I decided to make white, dark, and milk chocolate cups so used about 1/2 cup of each, maybe a little more)
1/2 cup creamy peanut butter
1/2 cup crunchy peanut butter (I didn't have crunchy peanut butter so just added some finely chopped peanuts)
1/2 cup icing sugar
generous pinch of salt
1/2 tsp vanilla extract


DIRECTIONS

Set wrappers on a baking sheet.

Melt approximately half of the chocolate, using a microwave-safe bowl, and cooking it in short intervals (about 30 seconds), stirring frequently, until smooth. Use a spoon to pour a little chocolate into each wrapper. Use a small, very clean brush to paint the chocolate up the sides of each wrapper (this worked great). Alternatively, you could add extra chocolate and swirl it around, pouring out the excess later, to coat the inside of the wrapper (I found the chocolate didn't get runny enough for this to work).

Chill cups until set, about 20-30 minutes.

In a small bowl, whisk together reamining ingredients (again in short intervals, stirring frequently), until it is very, very soft. Working carefully, transfer the filling to a pastry bag (or plastic bag with the tip cut off) and pipe a generous amount of the filling into each prepared cup.

Chill again for approximately 30 minutes, or until set.

Melt the remaining chocolate and fill each cup up with chocolate. Chill until set.

Serve cold or at room temperature.

Note: So they are easier to unwrap, fill the cups up close to the top but not level to the cup paper so there is something to grab onto when unwrapping it.

White Chocolate-Cranberry Biscotti

I had never made biscotti before now... but I will again. Yumm! I've only eaten biscotti a few times before so was surprised to find, when I started looking through recipes, that it is actually baked twice.

This recipe is another one from AllRecipes (submitted by Brenda Keith). It's a great recipe but I also look forward to trying it over and over again with different flavors.

INGREDIENTS

1/2 cup butter, softened
1 cup sugar
4 eggs
1 tsp vanilla extract
3 cups all purpose flour
1 Tbsp baking powder
3/4 cup dried cranberries
3/4 cup white chocolate chips (The recipe actually calls for 'white vanilla chips' ... is there such a thing? I don't know so I assumed it was a typo)

DIRECTIONS

In a mixing bowl, cream butter and sugar. Add eggs one at a time, beating well after each addition. Beat in vanilla.

Combine flour and baking powder; gradually add to creamed mixture. Stir in cranberries and white chocolate chips.

Divide dough into three portions.

On ungreased baking sheets, shape each portion into a 10-inch by 2-inch rectangle. Bake at 350 degrees for 20-25 minutes or until lightly browned. Let cool for 5 minutes.

Transfer to a cutting board. Cut diagonally with a serrated knife into 1-inch slices. Place cut side down on ungreased baking sheets. Bake for 15-20 minutes or until golden brown. Remove to wire racks to cool.

Store in an airtight container.

Yields 15 servings.

Viennese Crescent Holiday Cookies


This is another one taken from AllRecipes (submitted by Debby Hawkins). I’ve always thought these cookies look really dainty and festive. I’m not sure my finished product were very attractive but they were fun to make anyway.

INGREDIENTS
2 cups all purpose flour
1 cup butter
1 cup hazelnuts, ground (I used almonds instead and ground them in my coffee grinder)
1/2 cup icing sugar, sifted
1/8 tsp salt
1 tsp vanilla
2 cups icing sugar, sifted
1 vanilla bean

DIRECTIONS

Preheat oven to 375 degrees F (190 degrees C).

In a large mixing bowl, combine flour, butter, nuts, 1/2 cup confectioners' sugar, salt, and vanilla. Hand mix until thoroughly blended. Shape dough into a ball. Cover and refrigerate for 1 hour.

Meanwhile, place sugar in a bowl or small container. With sharp chef's knife, split vanilla bean lengthwise. Scrape out seeds, and mix them into the sugar. Cut pod into 2 inch pieces and mix into sugar.

Remove dough from refrigerator and form into 1 inch balls. Roll each ball into a small roll, 3 inches long. Place rolls 2 inches apart on ungreased cookie sheet, and bend each one to make a crescent shape.

Bake 10 to 12 minutes in the preheated oven, or until set but not brown.

Let stand 1 minute, then remove from cookie sheets. Place hot cookies on a large sheet of aluminum foil. Sprinkle with prepared sugar mixture. Turn gently to coat on both sides. Cool completely and store in an airtight container at room temperature. Just before serving, coat with more vanilla flavored sugar.

Butter Cookies with Butter Icing


I enjoy decorating cookies so I always make one batch of cookies so I can do just that. This year I found a Land O Lakes recipe in a magazine called 'Best Ever Butter Cookies' so decided to give it a shot.

INGREDIENTS
1 cup butter, softened
1 cup sugar
1 egg
2 1/2 cups all purpose flour
2 Tbsp orange juice
1 Tbsp vanilla
1 tsp baking powder

DIRECTIONS
Combine butter, sugar and egg in large bowl. Beat at medium speed until creamy. Reduce speed to low; add flour, orange juice, vanilla, and baking powder. Beat until well mixed.

Divide dough into thirds; wrap each in plastic wrap. Refrigerate until firm (2 hours or overnight).

Heat oven to 400 degrees. Roll out dough on lightly foured surface to a 1/4 to 1/8 inch thickness, one third at a time (keep remaining dough refrigerated). Cut with 3-inch cookie cutters. Place 1 inch apart on ungreased cookie sheets. Bake for 6 to 10 minutes or until edges are lightly browned. Cool completely before icing.

ICING (I made peppermint frosting and tinted it four different colors)
3 cups icing sugar
1/3 cup butter, softened
1 tsp vanilla
2 to 3 Tbsp milk

Combine all ingredients except milk in small bowl. Beat at low speed, scraping bowl often and gradually adding enough milk for desired spreading consistency.

Variations: For almond frosting, add 1/2 tsp almond extract. For cocoa frosting, stir in 1/2 cup unsweetened cocoa and increase milk to 5 to 6 Tbsp. For peppermint frosting, stir in 1 tsp peppermint extract. For spice frosting, stir in 1/4 tsp ground cinnamon, 1/8 tsp ground cloves, and 1/8 tsp nutmeg.

Tip: I divided my frosting into four and colored each one differently (plain red, blue, green, and yellow). I put each into a ziploc baggie, cut a very small bit off of one corner of the bag, and used it as a piping bag. It's cheaper than a real piping bag and just as easy.

Chewy Choco-Nut Triangles

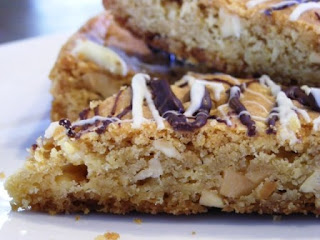
This is a Kraft recipe that I made last year and fell in love with. I can foresee this recipe becoming part of my own Christmas traditions. It's a cross between a big cookie and shortbread with peanuts and white chocolate mixed into the batter. The chocolate drizzled over the top makes it beautiful and festive and even more yummy!

INGREDIENTS
3/4 cup butter
1 1/2 cups firmly packed light brown sugar
2 eggs
1 1/2 cups flour
1 tsp baking powder
1 pkg (6 squares) white chocolate, divided
1 cup salted peanuts, coarsely chopped
1 square semi-sweet chocolate

DIRECTIONS
Preheat oven to 350 degrees. Line a 13 x 9 baking pan with foil or parchment paper, with ends extending over sides of pan. Spray foil/paper with cooking spray; set aside.

Beat butter and brown sugar until light and fluffy. Blend in eggs, flour and baking powder. Chop 5 squares of the white chocolate; stir into batter with peanuts. Spread into prepared pan.

Bake 20 to 25 mins or until toothpick inserted in centre comes out clean. Cool in pan. (Be careful not to overcook... two years in a row I have cooked it just a bit too much and it makes the edges crispy).

Melt remaining square of white chocolate and drizzle over baked rectangle. Melt semi-sweet chocolate and drizzle over baked rectangle. Lift from pan, using foil handles. Cut into triangles.

Stays moist and chewy for up to two weeks in a tightly sealed container or for up to a month tightly wrapped in the freezer.

Chocolate-Covered Cherry Cookies

Mmm... alliteration is almost as tasty as chocolates and cherries!


I got this recipe from AllRecipes.com (submitted by Barbara Hart) while looking for Christmas recipes. This is one of nine recipes that I made this year (my new kitchen made me a little over-zealous).

INGREDIENTS

1/2 cup butter, softened
1 cup sugar
1 egg
1 1/2 tsp vanilla extract
1 1/2 cups all-purpose flour
1/2 cup cocoa
1/2 tsp salt, divided
1/4 tsp baking powder
1/4 tsp baking soda
1 10-oz jar maraschino cherries
1 cup semisweet chocolate chips
1/2 cup sweetened condensed milk
DIRECTIONS
Cream butter and sugar. Add egg and vanilla; mix well. Combine the flour, cocoa, 1/4 tsp salt, baking powder, and baking soda; gradually add to the creamed mixture.
Drain cherries, reserving 1 1/2 tsp of the juice. Pat cherries dry. Shape 1 Tbsp of dough around each cherry. Place 2 inches apart on ungreased baking sheets. (Word of Advice: these cookies don't reshape as they cook. When done, they will look exactly as they do now so shape them as you want to).
Bake at 350 degrees for 8-10 minutes or until set. Cool on wire racks.
Frosting: In a saucepan, heat chocolate chips and milk until chips are melted (I used a water bath, to be on the safe side); stir until smooth. Remove from heat. Stir in reserved cherry juice and remaining 1/4 tsp salt. Frost cookies.

These cookies are so yummy! The cherry in the center is a perfect mix with the sweet chocolate. Anyone who loves those cherry chocolates will love this cookie. I've never made a frosting with just chocolate and sweetened condensed milk but it is delicious and easy.